2. Base Configuration and Traffic Baseline
In this module, we will configure the base DoS profile and Local Traffic Manager objects used in the remaining modules. Additionally, you will generate traffic needed for Advanced Web Application Firewall Behavioral DoS engine to build a learning baseline.
- Objectives:
- Create DoS Profile
- Create Logging Profile and attach to virtual server
- Create iRule for inserting X-Forwarded-For headers and attach to virtual server
- Generate good traffic to establish BaDOS baseline
- Verify BaDOS learning status
Attention
In this lab, you will configure a number of options to get the lab started. In modules 3 and 4 we will spend time examining the configuration options in more detail. For now, just configure the options as outlined, and we will examine further in later modules.
2.1. Set up the DoS profile
In the section you will create a DoS profile with Behavioral Detection and Analysis enabled, and attach the DoS profile to the virtual server.
Using Chromium Browser on the Xubuntu Jumpbox, open a tab to the GUI on bigip01 (https://10.1.1.245).
Navigate to Security ›› DoS Protection : DoS Profiles
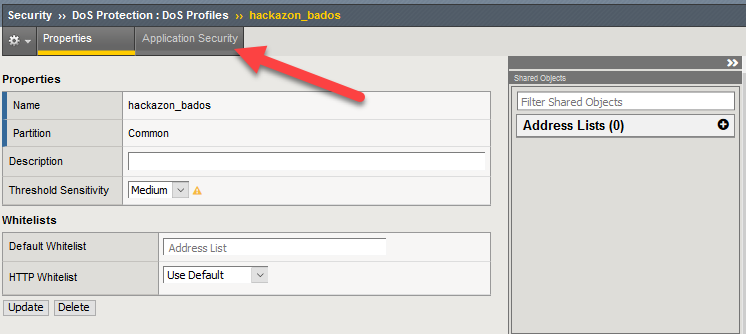
Select Create. Name your profile hackazon_bados and select Finished. Open your hackazon_bados DoS profile.
Select the Application Security tab from DoS Profile navigation bar.
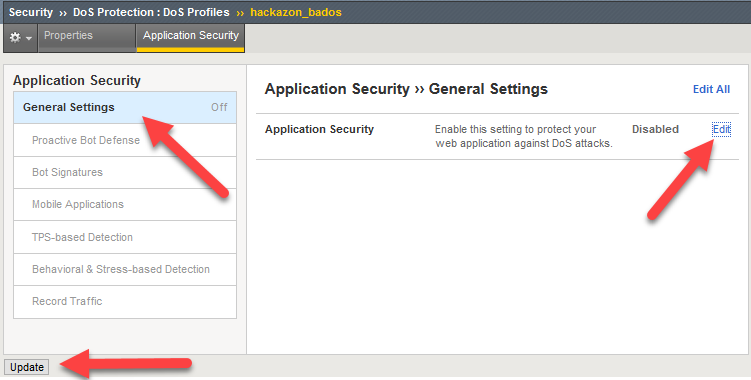
Click General Settings, select Edit to the right of Application Security in the rightmost panel, and check the Enable box.
This will activate the other sections of the DoS profile.
Tip
At any point you can save your changes by hitting the Update button in the lower left-hand corner
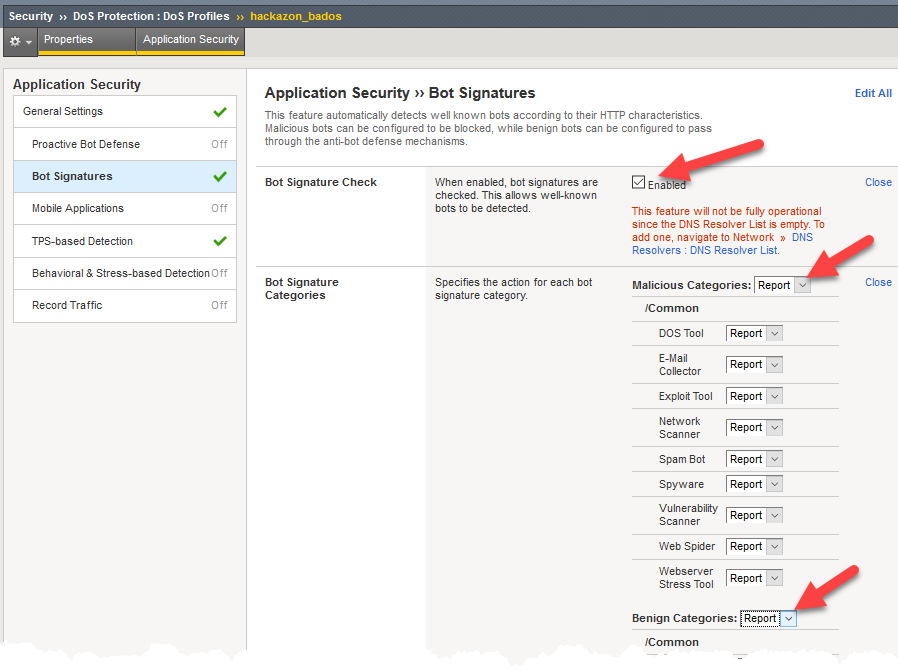
Select the Bot Signatures section, then select the Edit link to the right of Bot Signature Check, and check the Enabled box.
Select Edit next to Bot Signature Categories then change both the Malicious Categories and Benign Categories to Report. This step is necessary because the tools used to generate baseline and attack traffic in this lab will both be categorized as bots.
Attention
The message in red below the Enabled box indicates a DNS Resolver has not been set up. The DNS resolver is used to perform DNS reverse lookups as part of bot identity validation, but is not relevant for this lab exercise.
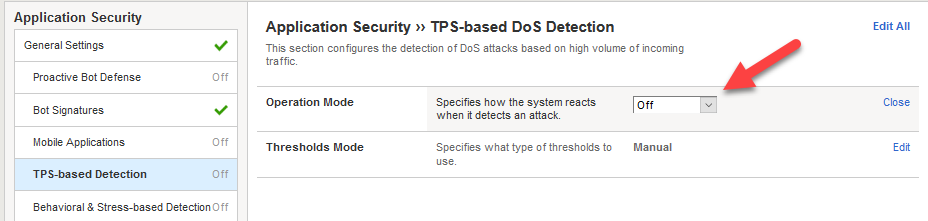
Select TPS-base DoS Detection and change Operation Mode to Off.
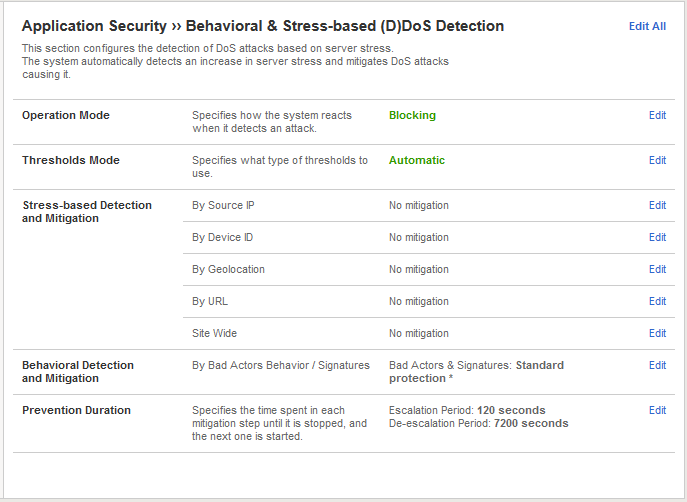
Select Behavioral & Stress-based Detection and change Operation Mode to Blocking.
- Set the Thresholds Mode to Automatic.
- Under Stress-based Detection and Mitigation edit By SourceIP and uncheck Request Blocking. Under By URL uncheck Heavy URL Protection and Request Blocking.
- Under Behavioral Detection and Mitigation check the Request signatures detection and set the Mitigation to Standard. For now, please leave bad actors detection unchecked.
- Click Update in the lower left-hand corner. Collapse all the sections, and Behavioral & Stress-based Detection should match the figure below.
2.2. Create a DoS Logging Profile
Logging profiles are required to enable local and remote logging for Application DoS and Bot events. In this lab, we will use local logging to review events. Below are the steps to configure the logging profile and attach to your test virtual server.
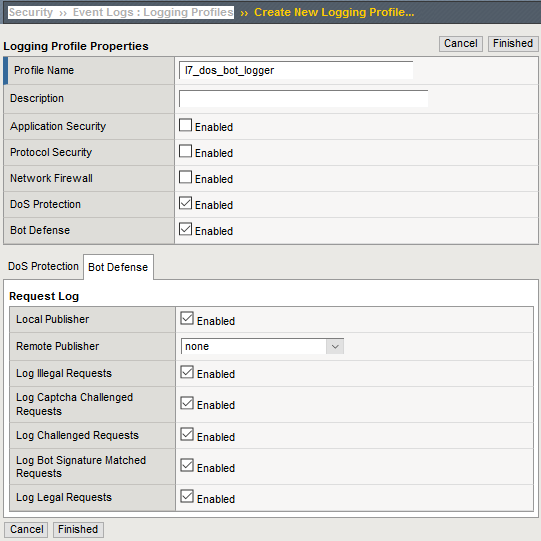
Go to Security ›› Event Logs : Logging Profiles and click Create on right-hand side of the configuration screen. Name your profile l7_dos_bot_logger then check the DoS Protection and Bot Defense enable boxes.
From the DoS Protection tab enable the Local Publisher.
From the Bot Defense tab check ALL the boxes.
Click Finished.
2.3. Add the DoS profile to a virtual server
Below are the steps to associate this profile with the Local Traffic Manager virtual server processing the application traffic in this lab.
Navigate to Local Traffic > Virtual Servers > Virtual Server List and select vs_hackazon_http. Under the Security tab on the top bar select Policies.
Enable the DoS Protection Profile and select the hackazon_bados profile.
Add l7_dos_bot_logger to the Log Profile and Update
For purposes of this lab, Disable the Application Security Policy and remove asm_allrequests from the Log Profile.

2.4. Create XFF-Mixed_Attacker iRule
Because we do not have dozens of good and bad source IPs available for clients and attackers in this environment, we simulate them by adding an iRule to the virtual server. The iRule adds a randomized X-Forwarded-For (XFF) header to each request.
Navigate to Local Traffic ›› iRules : iRule List and select Create. Name a new iRule named XFF_mixed_Attacker_Good_iRule. Copy and paste the iRule below.
 1
 2
 3
 4
 5
 6
 7
 8
 9
10
11
12
13
when HTTP_REQUEST {
   # Good traffic
    if { [IP::addr [IP::client_addr] equals 10.1.10.52] } {
      set xff 153.172.223.[expr int(rand()*100)]
      HTTP::header insert X-Forwarded-For $xff
   }

   # Attack traffic
    if { [IP::addr [IP::client_addr] equals 10.1.10.53] } {
      set xff 132.173.99.[expr int(rand()*25)]
      HTTP::header insert X-Forwarded-For $xff
   }
 }
Advanced Web Application Firewall/Application Security Manager will honor the X-Forwarded-For header by enabling this in the http profile.
2.5. Create HTTP Profile to Accept X-Forwarded-For HTTP Header
- Navigate to Local Traffic ›› Profiles : Services : HTTP and click Create. Name the new http profile xff_http, and click the rightmost checkbox in the row Accept XFF to enable a custom setting, then click the checkbox to the immediate right of Accept XFF to enable processing of an inbound X-Forwarded-For header.
- Click Finished button at bottom of configuration page.
Tip
Due to a large number of service profiles, occasionally part of the Services menu will get stuck under the browser menu. If that happens, click on Profiles on the side-bar, then click Services in the top navigation bar to get to the HTTP profile.
2.6. Attach iRule and HTTP Profile to Local Traffic Manager Virtual Server
- Navigate to the vs_hackazon_http virtual server. In the Properties tab, under Configuration section, select xff_http for the HTTP Profile.
- Click the Resources tab in the virtual server navigation bar, in the iRules section select the Manage button, and move the XFF_mixed_Attacker_Good_iRule from the Available to the Enabled box.
- Click Finished button at bottom of the Resource Management page.
2.7. Generate Traffic to Establish Baseline
Advanced Web Application Firewall’s Behavioral DoS feature is based on learning and analyzing all traffic to the web application, building baselines, and then idenitifying anamolies when server stress is detected. As a result, in this lab, we need to generate normal traffic allowing Advanced Web Application Firewall to build a baseline.
You will use the Xubuntu Jumpbox to generate legitimate traffic and bad traffic, eth1 has 10.1.10.51-55 configured and 10.1.10.52 will be the source-IP used for the good traffic script. The source IP will match XFF_mixed_Attacker_Good_iRule created above, and an X-Forwarded-For header will be placed in the HTTP request in the 153.172.223.0/24 IP address range.
In the home directory (/home/f5student) on the Xubuntu Jumpbox, you will find the two scripts used for this lab:
- baseline_menu.sh - is used to create baseline traffic
- AB_DOS.sh - is used to launch L7 DOS attacks
Start baseline traffic, using Xubuntu Jumpbox Terminal application, navigate to the home directory, then type:
f5student@xjumpbox~$ ./baseline_menu.sh

- Select option 2 **alternate** and keep it running in the window
Tip
This is your valid traffic, and the number of requests will change over time. The requests also change as the script continuously alters the User-Agent header and the requested URI. Both values are randomly taken from files in the “source” directory in the home directory.
Next, validate you are seeing the traffic, and Advanced Web Application Firewall is actively building learning baselines. From a separate Terminal window type:
f5student@xjumpbox$~ ssh root@10.1.1.245Then, run the following command:
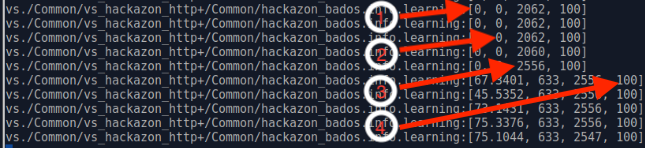
[root@bigipo01:Active:Standalone] config # admd -s vs./Common/vs_hackazon_http+/Common/hackazon_bados.info.learning

- /Common/vs_hackazon_http  – is the name of the virtual server
- /Common/hackazon_bados    – is the name of the DoS profile.
**It may take several minutes for baseline numbers to be generated**
Screenshot of sample output below:
Tip
If your aren’t getting any output, or seeing no signs of accumulated signals, verify the name of the virtual server and profile in the admd command are accurate.
- baseline_learning_confidence:
- Description: in % how confident the system is in the baseline learning.
- Desired Value: > 90%
- learned_bins_count:
- Description: number of learned bins
- Desired Value: > 0
- good_table_size:
- Description: number of learned requests
- Desired Value: > 2000
- good_table_confidence:
- Description: how confident, as %, the system is in the good table
- Desired Value: Must be 100 for signatures
Note
It may take 5 or more minutes before you begin to get learned baseline numbers. Also, the desired values are the minimum values we would like to see prior to triggering attacks as part of this lab exercise. You can, however, move onto module 3 and 4 in this lab while baselines are being established. Do not stop baseline traffic script
To see all of the values available and wide range of interesting statistics, enter the following command from BIG-IP console:
admd -s vs./Common/vs_hackazon_httpTo view Advanced Web Application Firewall layer 7 DoS log, enter the following command from BIG-IP console:
tail -f /var/log/dosl7/dosl7d.log