Module 3: Automatic Mitigations
Lab 3.1 – Auto Thresholding for Mitigating Attacks.
Your organization is about to launch a new marketing campaign and there is a website that will host the content. You want to make sure that the application is protected against DDoS attacks but are not sure what traffic patterns are or what values to set for detections/rate limits/mitigations. You will create a Protected Object for the marketing website and use automatic mitigations.
- In the BIG-IP Configuration Utility, open the DoS Protection>>Quick Configuration page and in the Protected Objects section click Create.
- Configure a protected object using the following information, and then click Create.
| Parameter | Value |
|---|---|
| Name | MarketingServer |
| IP Address | 10.1.20.15 |
| Port | * |
| Protocol | All Protocols |
| Protection Settings: Action | Log and Mitigate |
| Threshold Sensitivity | High |
| Protection Settings: DDoS Settings | IPv4, TCP, |
Generate some good traffic to the marketing server.
- Putty SSH (use the shortcut) to open a shell to the good client system.
- Login as user: ubuntu. The session is preconfigured to authenticate with a certificate.
- Start the auto-threshold baselining script with:
# sudo bash
# cd f5agility
# ./auto_baseline.sh
Let this baseline traffic run for at least 10 minutes before proceeding to the below step.
In our lab we need to roll back the device level protection so that it doesn’t mitigate the stress we are generating for the auto-threshold on the MarketingServer.
- In the Configuration Utility, in the Device Protection section click Device Configuration.
- In the Flood row click the + icon, and then click ICMPv4 flood.
- On the right-side of the page select the drop-down to “Detect-Only”
| Parameter | Value |
|---|---|
| Mitigation | Fully Manual |
| Detection Threshold EPS | Infinite |
| Detection Threshold Percent | 500 |
| Rate/Leak Limit | Infinite |
Click Update at the bottom of the screen. This will allow our attack to pass through to the automatic mitigation profile of the MarketingServer that we are configuring below.
In the Hybrid Defender WebUI, for the MarketingServer Protected Object configuration, enable auto-thresholding for the following vectors: ICMPv4 Flood, TCP SYN Flood, TCP Push Flood, TCP RST Flood, TCP SYN ACK Flood by selecting each vector and clicking the “Fully Automatic” Configuration radio button. When all vectors are configured, click Update at the bottom of the screen.
In the Hybrid Defender WebUI, view the Auto Threshold event log by navigation to Security>>Event Logs>>DoS>>Network>>Auto Threshold.
The system is updating the detection thresholds. With auto-thresholding, the system adjusts the detection thresholds based on observed traffic patterns. However, mitigation rate limits are always dynamic based on detected system or protected object stress. If anomalous levels of traffic are running, but there is no stress, the Hybrid Defender will generate alerts but will not block traffic. Under stress, the rate limits are automatically created and adjusted dynamically.
Generate some stress by launching an attack.
Access the Attacker System CLI/shell (use putty shortcut on Jumpbox) and launch the attack:
# sudo bash
# cd f5agility
# ./lab3-1.sh
Keep on refreshing the Auto Threshold event log Security>>Event Logs>>DoS>>Network>>Auto Threshold and observe how the values are changing dynamically. Even though our attack is ICMPv4 flood the other vectors that are set to Fully Automatically are also being adjusted dynamically.
View Security>>DoS Protection>>DoS Overview. Notice how automatic detection and mitigation is happening as stress varies.
Stop all scripts and attacks using CTRL + C.
Lab 3.2 – Behavioral L4 for Mitigating Attacks
In this lab you will use the Hybrid Defender’s network behavioral DoS analysis capabilities and its ability to interpret behavioral history and stress to automatically generate and enforce a precise, dynamic signature. This capability allows the granular filtering of the good from the bad, which is a major challenge in DoS mitigation. The bad must be accurately identified to mitigate the DoS attack, particularly if the attack changes over time. Enforcement of a very precise signature, with enforcement thresholds based on system or network stress signals, dramatically reduces false positives—increasing network and application availability.
- In the BIG-IP Configuration Utility, open the DoS Protection > Quick Configuration page
- In the Protected Objects section click Create.
- Configure a protected object using the following information, and then click Create.
| Parameter | Value |
|---|---|
| Name | BaDoSL4Server |
| IP Address | 10.1.20.13 |
| Port | * |
| Protocol | All Protocols |
| Protection Settings: Action | Log and Mitigate |
| Protection Settings: DDoS Settings | IPv4, TCP, L4 Behavioral |
- In the L4 Behavioral row click the + icon.
- Configure under Dynamic Signatures using the following information, and then click Create.
| Parameter | Value |
|---|---|
| Learn Only | Unchecked |
| Mitigation Sensitivity | High |
- Putty SSH (use the shortcut) to open a shell to the good client system.
- Login as user: ubuntu. The session is preconfigured to authenticate with a certificate.
- Start the behavioral L4 baselining script with:
# sudo bash
# cd f5agility
# ./baseline_L4.sh
You can monitor the learning progress on the DHD.
- Putty SSH (use the shortcut) to open two shells to the HybridDefender.
- Login as user: root and password provided.
- View the behavioral L4 baselining learning with following in 1st shell. Notice the learning phase In Progress.
# cd f5agility
# ./show_baseline_L4_status.sh
- View the behavioral L4 baselining bins populating in 2nd shell.
# cd f5agility
# ./show_baseline_L4_bins.sh
- While the learning is happening, we need to turn off some manual mitigations at Device Level as they will block our attack that is going to create stress to trigger dynamic signatures.
- In the Configuration Utility, in the Device Protection section click Device Configuration.
- In the Flood row click the + icon, and then change click TCP SYN Flood, TCP SYN Oversize and change the attack vector to “Detect-Only”.
- In the Single Endpoint row click the + icon, and then change click Single Endpoint Sweep and change the attack vector to “Detect-Only”.
Make sure the status is changed from “In Progress” to “Finished” for the learning phase on the DHD before proceeding to the next steps below (about 15 minutes)
- Access the Attacker System CLI/shell and launch the attack:
# sudo bash
# cd f5agility
# ./lab3-2.sh
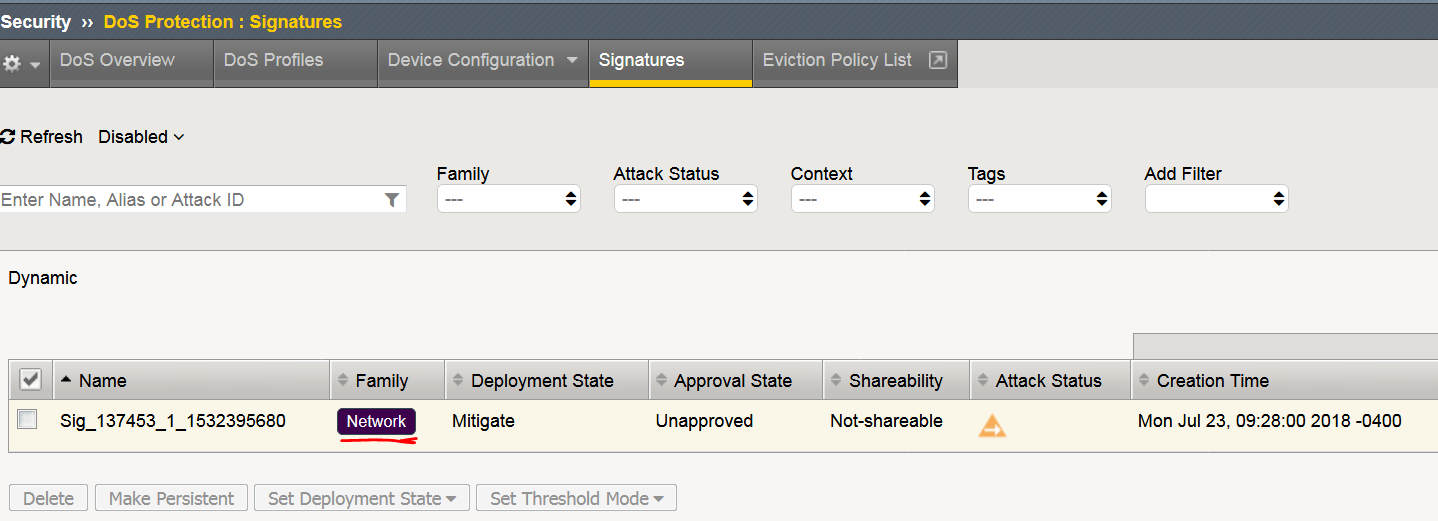
On the Hybrid Defender you will now see the attack is being detected/mitigated. . Did you notice the dynamic signatures in DoS Overview window? Give it a couple of minutes and it will show up. You can view the signature Security>>DoS Protection>>Signatures under Dynamic Signature section. Click on the “Network” (not the signature hyperlink) to view details of the signature.
Use CTRL+C in all shells - attacker, good traffic, DHD to stop all scripts.
Lab 3.3 – Behavioral L7 for Mitigating Attacks
In this lab you will use the Hybrid Defender’s application behavioral DoS analysis capabilities and its ability to interpret behavioral history and stress to automatically generate and enforce a precise, dynamic signature. This capability allows the granular filtering of the good from the bad, which is a major challenge in DoS mitigation. The bad must be accurately identified to mitigate the DoS attack, particularly if the attack changes over time. Enforcement of a very precise signature, with enforcement thresholds based on system, network or application stress signals, dramatically reduces false positives—increasing network and application availability.
- In the BIG-IP Configuration Utility, open the DoS Protection > Quick Configuration page and in the
- In the Protected Objects section click Create.
- Configure a protected object using the following information, and then click Create.
| Parameter | Value |
|---|---|
| Name | BaDoSL7Server |
| IP Address | 10.1.20.20 |
| Port | 80 |
| Protocol | TCP |
| Protection Settings: Action | Log and Mitigate |
| Protection Settings: DDoS Settings | IPv4, TCP, HTTP |
- In the HTTP row click the + icon.
- Click Behavioral and in the right pane configure using the following information.
| Parameter | Value |
|---|---|
| Mitigation | Standard Protection |
| Request Signature Detection | Checked |
- Click Proactive Bot Defense and in the right pane configure using the following information.
| Parameter | Value |
|---|---|
| Mitigate Action | Disabled |
- Click DOS Tool and in the right pane configure using the following information, and then click Create.
| Parameter | Value |
|---|---|
| Mitigate Action | Report |
Putty SSH (use the shortcut) to open two shells to the good client system.
- Login as user: ubuntu. The session is preconfigured to authenticate with a key.
- Start the behavioral L7 baselining script in both shells with:
# sudo bash
# cd f5agility
# ./baseline_L7.sh
Select 1) Increasing in first shell and 2) Alternate in the second shell.
You will see a few 0000 statuses as there are certain bad requests in the script. But majority of status is 200s.
You can monitor the learning progress on the DHD.
- Putty SSH (use the shortcut) to open a shell to the HybridDefender.
- Login as user: root and password provided.
- View the behavioral L7 baseline learning with following. Notice the learning phase In Progress.
# cd f5agility
# ./show_L7BaDoS_learning.sh
The output is like this:
”vs./Common/BaDoSL7Server+/Common/BaDoSL7Server.info.learning:[62.0614, 6, 7061, 100]”
It will be 0.00 for a while (in above example output 62.0614 is the average approximation to the learned baselines)
For this demo, wait until you have reached at least 80.00-90.00 (the first number in the output). This should happen after about 8-10 minutes. Once you see 80.00 and above you can move to next steps.
The longer it runs, the better it is, because the system is self-adjusting permanently.
Make sure the status is “80.00-90.00” range (the first number in the output) for the learning phase on the DHD before proceeding to the next steps (about 10 minutes). Once you see 80.00 and above you can move on.
- Hit CTRL+C in the DHD Shell and stop this learning status. We will now use this Shell window to see the dynamic signature that is generated.
- Keep this shell window easily viewable. Behavioral L7 mitigation is very dynamic and hence based on the environmental conditions, underlying infrastructure for your lab instance some of you may see the Signature quickly appear and vanish, some may not see it and some will see it longer. Basically, the Signature mitigation is triggered and then by default the offending IP is added to Bad Actor/Shun list and the signature disappears if the system identifies it’s no longer needed for mitigation.
# ./show_dos_signature.sh
- Access the Attacker System CLI/shell (use putty shortcut on Jumpbox) and launch the attack. Open TWO shells. In first shell:
# sudo bash
# cd f5agility
# ./lab3-3.sh
Choose 1) Attack Start – Similarity
- In Second shell:
# sudo bash
# cd f5agility
# ./lab3-3.sh
Choose 2) Attack Start – Score
As soon as the attack is started you will see that your baseline traffic status of 200s in the good client is now suddenly going to 0000. Wait for a couple of minutes till it returns to a lot more 200s. (Keep the eye on the DHD Shell for Signature)
On the Hybrid Defender Shell you will now see the attack is being mitigated and a signature may appear (see note above).
View Bot Defense logs. Security>>Event Logs>>Bot Defense>>Requests
View Bad Actor Log/Blacklist and notice the offending IP is added to the list. Security>>Event Logs>>Network>>Shun
Use CTRL+C in all open shell windows (Attacker, Good Client, Hybrid Defender) to STOP all traffic and scripts. Close out all windows